Scenes table and scene properties
Scenes table details
The Scenes table displays both default and customized settings for scenes. The scenes table works the same way on both Casambi Pro for Windows and Casambi Pro for iOS.
- Windows
- iOS
Windows
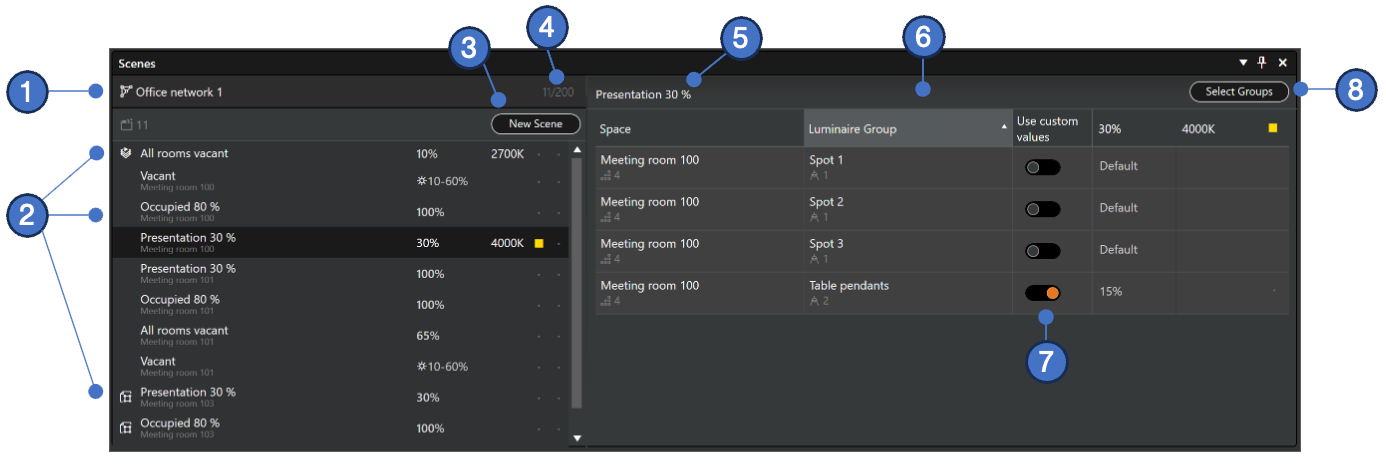
SCENES LIST (left side of the pane):
- Header and Capacity: The header displays the currently selected Network or Network and Space (the object selected from the layout, from the Project Explorer list or from the Networks list). It also indicates the network's scene capacity (e.g.,
8/200); each network supports a maximum of 200 scenes. - Scenes List:
- Context: List of items depends on the currently selected network or space.
- If a space is selected, the list only displays scenes where at least one luminaire group from that space participates.
- If a network is selected, the list displays all scenes in that network.
- If no network or space is selected, the Scenes list is empty.
- Scene rows:
- Each scene row shows the scene name and the default lighting parameters set to it. Additionally, if scene's scope is only one space, the space's name is shown below the scene name.
- If a scene contains luminaire groups from more than one space, the network level scene icon (
 ) is displayed.
 - If a scene belongs to a space which is linked to a space template, the space template scene icon (
 ) is displayed. Note, that the scenes derived from a space template can only be edited in Casambi Pro for Windows, in the space template editor.
- Selection: Click a scene name to select it from the list to see its details on the right.
- Context: List of items depends on the currently selected network or space.
- New Scene Button: Clicking this button opens a dialog where you can enter a name and default dimming value to the new scene, and select which luminaire groups will be participating to that scene. See more in Creating a scene page.
- Scene count: Number of scenes in the currently selected network. The maximum number of scenes in one network is 200.
LUMINAIRE GROUP TABLE (right side of the pane):
- Name of the currently selected scene This name field is interactive, clicking it will show scene's default properties in the Property Pane.
- Luminaire groups list: The participating luminaire groups in the currently selected scene are listed here in table of four columns:
- Column 1: Name of the parent space where the group is located, and total number of groups in that space
- Column 2: Name of the luminaire group and the number of paired luminaires in the group
- Column 3: Use of custom values: If this toggle is switched On, the luminaire group is using locally set values for dimming or other parameters, instead of scene's default values. When toggled Off, the group will use scene's default values.
- Column 4: Luminaire parameter values
- Dimming in percentage. If the scene is controlled by a circadian profile or by daylight sensor, a related icon is displayed (
 ).
). - Colour Temperature in Kelvin. This value is displayed only if the Colour Temperature parameter is used in the scene. If the scene is controlled by a circadian profile or by daylight sensor, a related icon is displayed (
 ).
). - Colour as a coloured square. This value is displayed only if the Colour parameter is used in the scene. Exact colour values can be seen and adjusted in the scene properties.
- Dimming in percentage. If the scene is controlled by a circadian profile or by daylight sensor, a related icon is displayed (
- Use custom values toggle
- If switch is Off: Scene's default values are applied to this luminaire group
- If switch is On: The default scene values are replaced with custom parameters set in the property pane. These values will be applied to only this group. This same toggle option is available in the Property Pane when the group row is selected.
- Select Groups: Opens a dialog where it is possible to add or remove luminaire groups to/from the currently focused scene. Note, that only groups from the same network can be included in a scene.
If a circadian profile is used for controlling the dimming and/or colour temperature, it is always applied to the entire scene. Thus, in this case, the circadian profile control cannot be overruled by applying group specific values for individual luminaire groups.
iPad
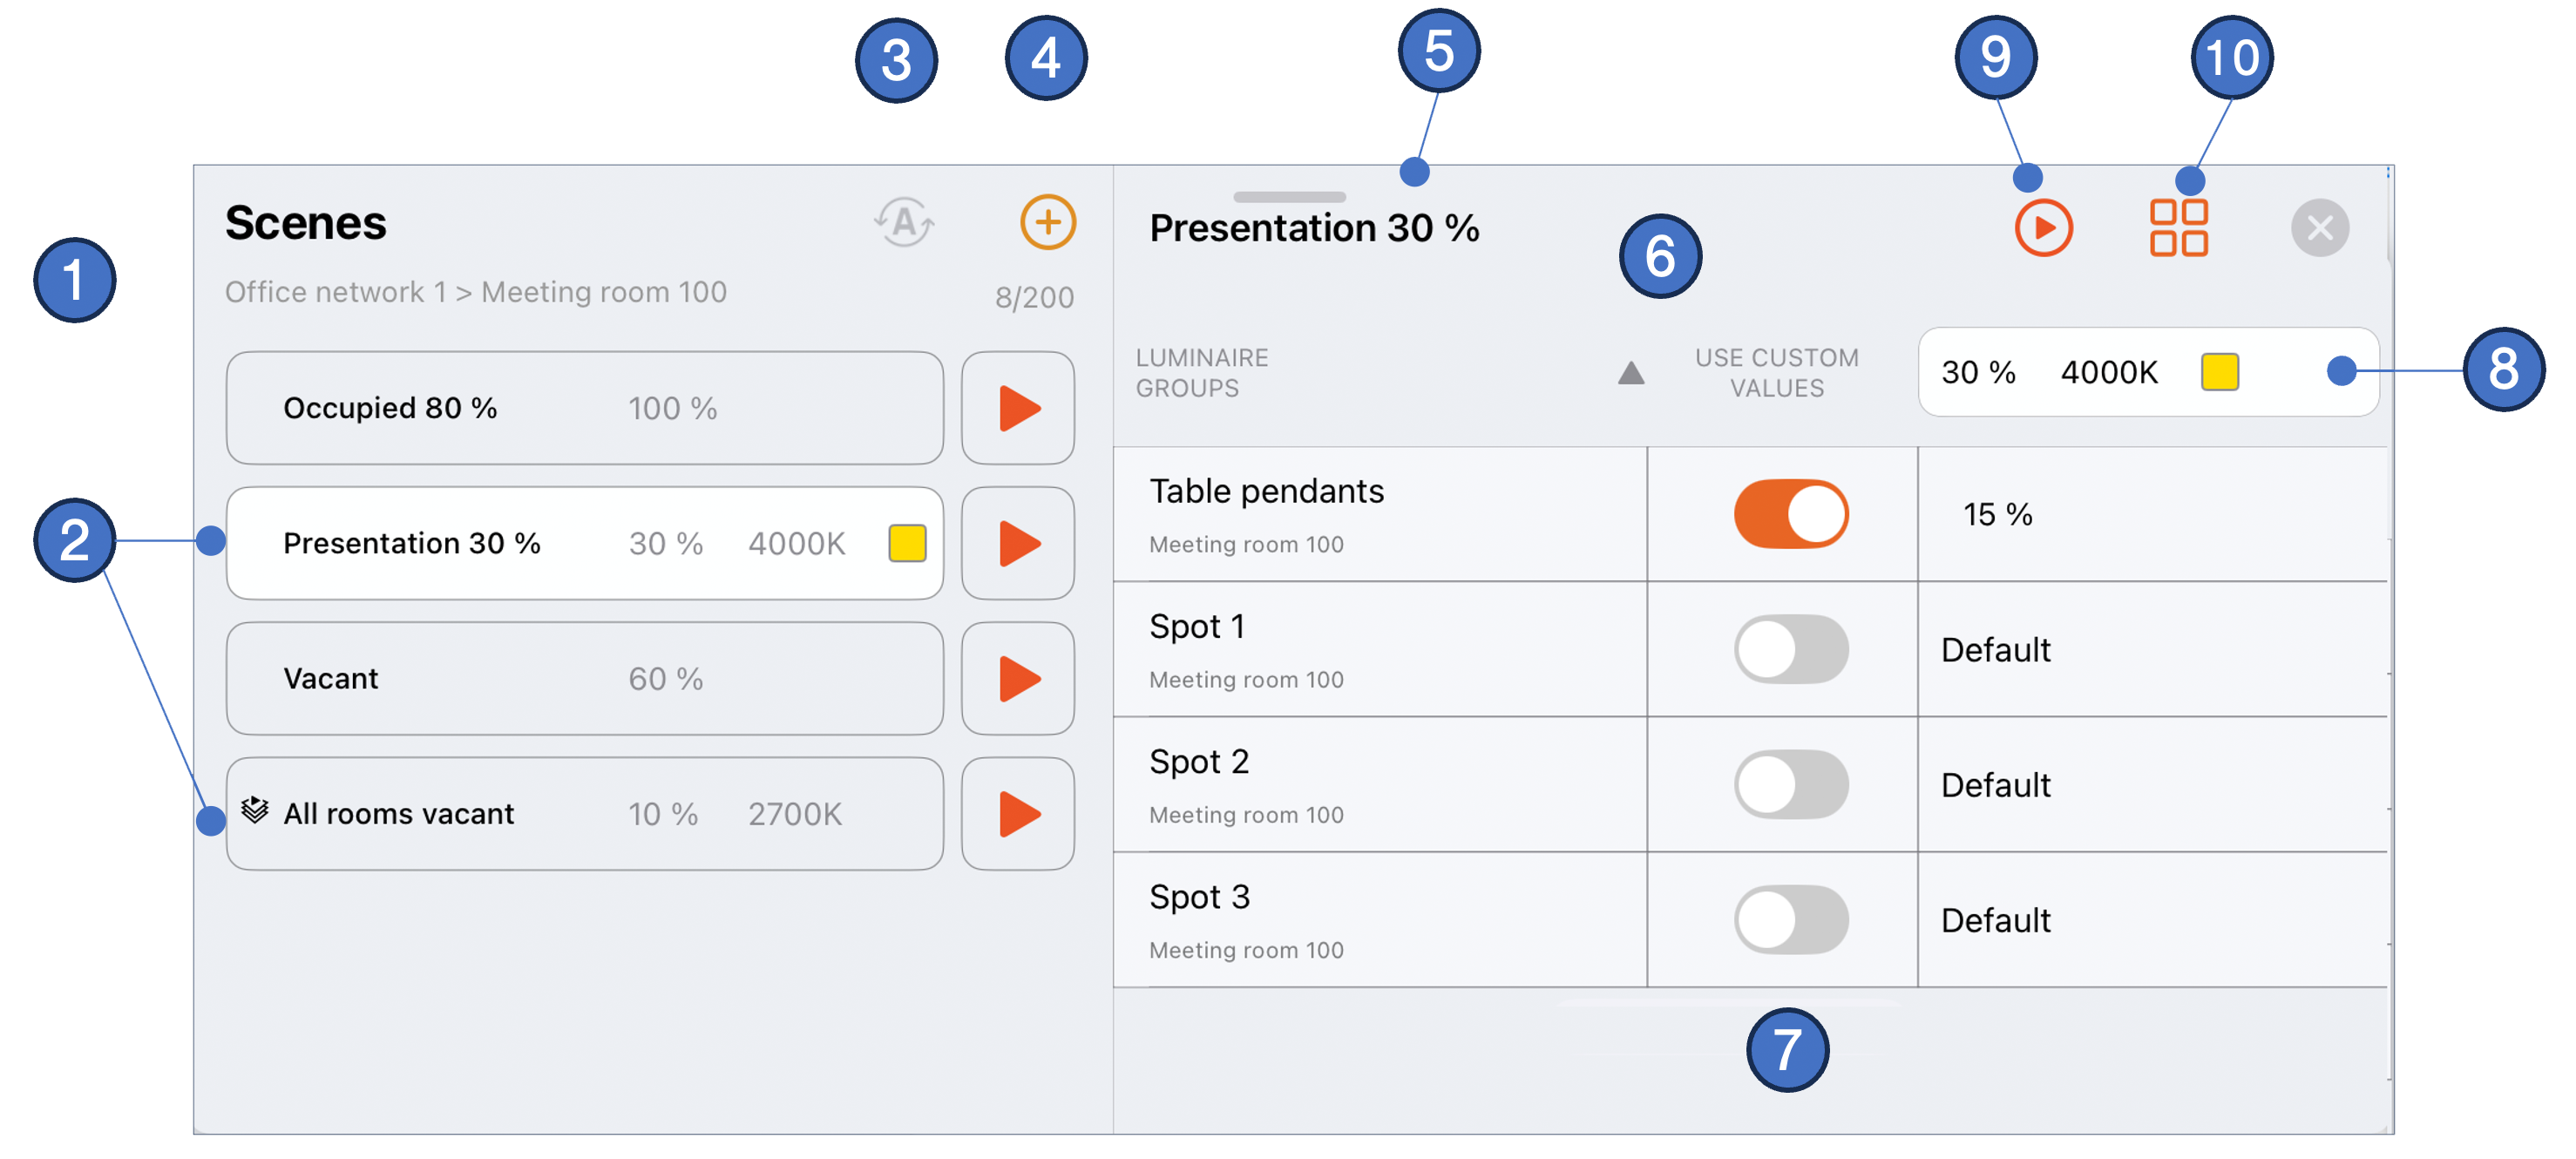
On iOS devices, the Scenes table has some additional features compared with the Casambi Pro for Windows. This is because on iOS there is a network connection to the physical devices, and scenes can be activated. The user interface is also dynamic, the amount of details shown depends on the available screen space of the used device.
SCENES LIST (left side of the pane):
- Header and Capacity: The header displays the currently focused Network or Network and Space (the object selected from the layout, from the Project Explorer list or from the Networks list). It also indicates the network's scene capacity (e.g.,
8/200); each network supports a maximum of 200 scenes.- If a single space is selected, the list only displays scenes where at least one luminaire group from that space participates.
- If a network is selected, the list displays all scenes in that network.
- If no network or space is selected, the Scenes list is empty.
- Scenes List:
- Context: List contents depend on the selected network or space.
- Selection: Click a scene name to select it from the list to see its details on the right. When a scene is selected, all participating luminaire groups are highlighted in green on the floor plan layout.
- iOS only Play/Stop button for activating/deactivating a scene.
- iOS only: The Resume automation button. Resuming automation will disable any manually activated scenes and allow the luminaires to be controlled by sensors or timers.
- New Scene Button: Clicking this button opens a dialog where you can enter a name and default dimming value to the new scene, and select which luminaire groups will be participating to that scene. See more in Creating a scene page.
LUMINAIRE GROUP TABLE (right side of the pane):
- Name of the currently selected scene
- When this label is tapped, current scene's default properties are displayed in the property pane
- The default properties are also displayed when the value column header is tapped (number 8 in the image).
- Luminaire Group Table
- When a scene is selected, table rows show participating luminaire groups, their parent spaces, and specific behaviour.
- By default, the default values for the scene are displayed in the Properties pane
- Click a row to edit that group’s local behavior in the Properties pane.
- The participating luminaire groups in the currently selected scene are listed here in table of rows and columns. Please note, that on iOS devices (iPad and iPhone), the user interface is dynamic and the number of columns visible depends on the screen width of the used device.
- Columns from the left:
- Column 1: Name of the luminaire group and the name of the parent space
- Column 2: Use of custom values: If this toggle is switched On, the luminaire group is using locally set values for dimming or other parameters, instead of scene's default values. When toggled Off, the group will use scene's default values.
- Column 3: Luminaire parameter values
- Dimming in percentage. If the scene is controlled by a circadian profile or by daylight sensor, a related icon is displayed ( ).
- Colour Temperature in Kelvin. This value is displayed only if the Colour Temperature parameter is used in the scene. If the scene is controlled by a circadian profile or by daylight sensor, a related icon is displayed ( ).
- Colour as a coloured square. This value is displayed only if the Colour parameter is used in the scene. Exact colour values can be seen and adjusted in the scene properties.
- Dimming in percentage. If the scene is controlled by a circadian profile or by daylight sensor, a related icon is displayed (
- Use custom values toggle
- If switch is Off: Scene's default values are applied to this luminaire group
- If switch is On: The default scene values are replaced with custom parameters set in the property pane. These values will be applied to only this group. This same toggle option is available in the Property Pane when the group row is selected.
- The column label cell displays the default scene values for dimming, colour temperature and colour.
- If the scene is controlled by a circadian profile or by daylight sensor, a related icon is displayed.
- If the value column label cell is tapped, scene's default properties are displayed on the Properties pane.
- iOS only: Play/Stop buttons at the scene list and at the top right button bar, for activating/deactivating a scene.
- Select Groups: Opens a dialog where it is possible to add or remove luminaire groups to/from the currently focused scene. Note, that only groups from the same network can be included in a scene.
If a circadian profile is used for controlling the dimming and/or colour temperature, it is always applied to the entire scene. Thus, in this case, the circadian profile control cannot be overruled by applying group specific values for individual luminaire groups.
Drag the horizontal bar at the top of the pane to resize the Scenes pane.
Scene properties
Dimming level is the only mandatory parameter for a scene in Casambi Pro. When needed, additional parameters can be activated in the Mains and Other tabs. There are three additional parameters available: Colour Temperature, Colour and Up/Down light ratio.
Scene default values
The default values of a scene will be inherited automatically by all luminaire groups in the same scene.
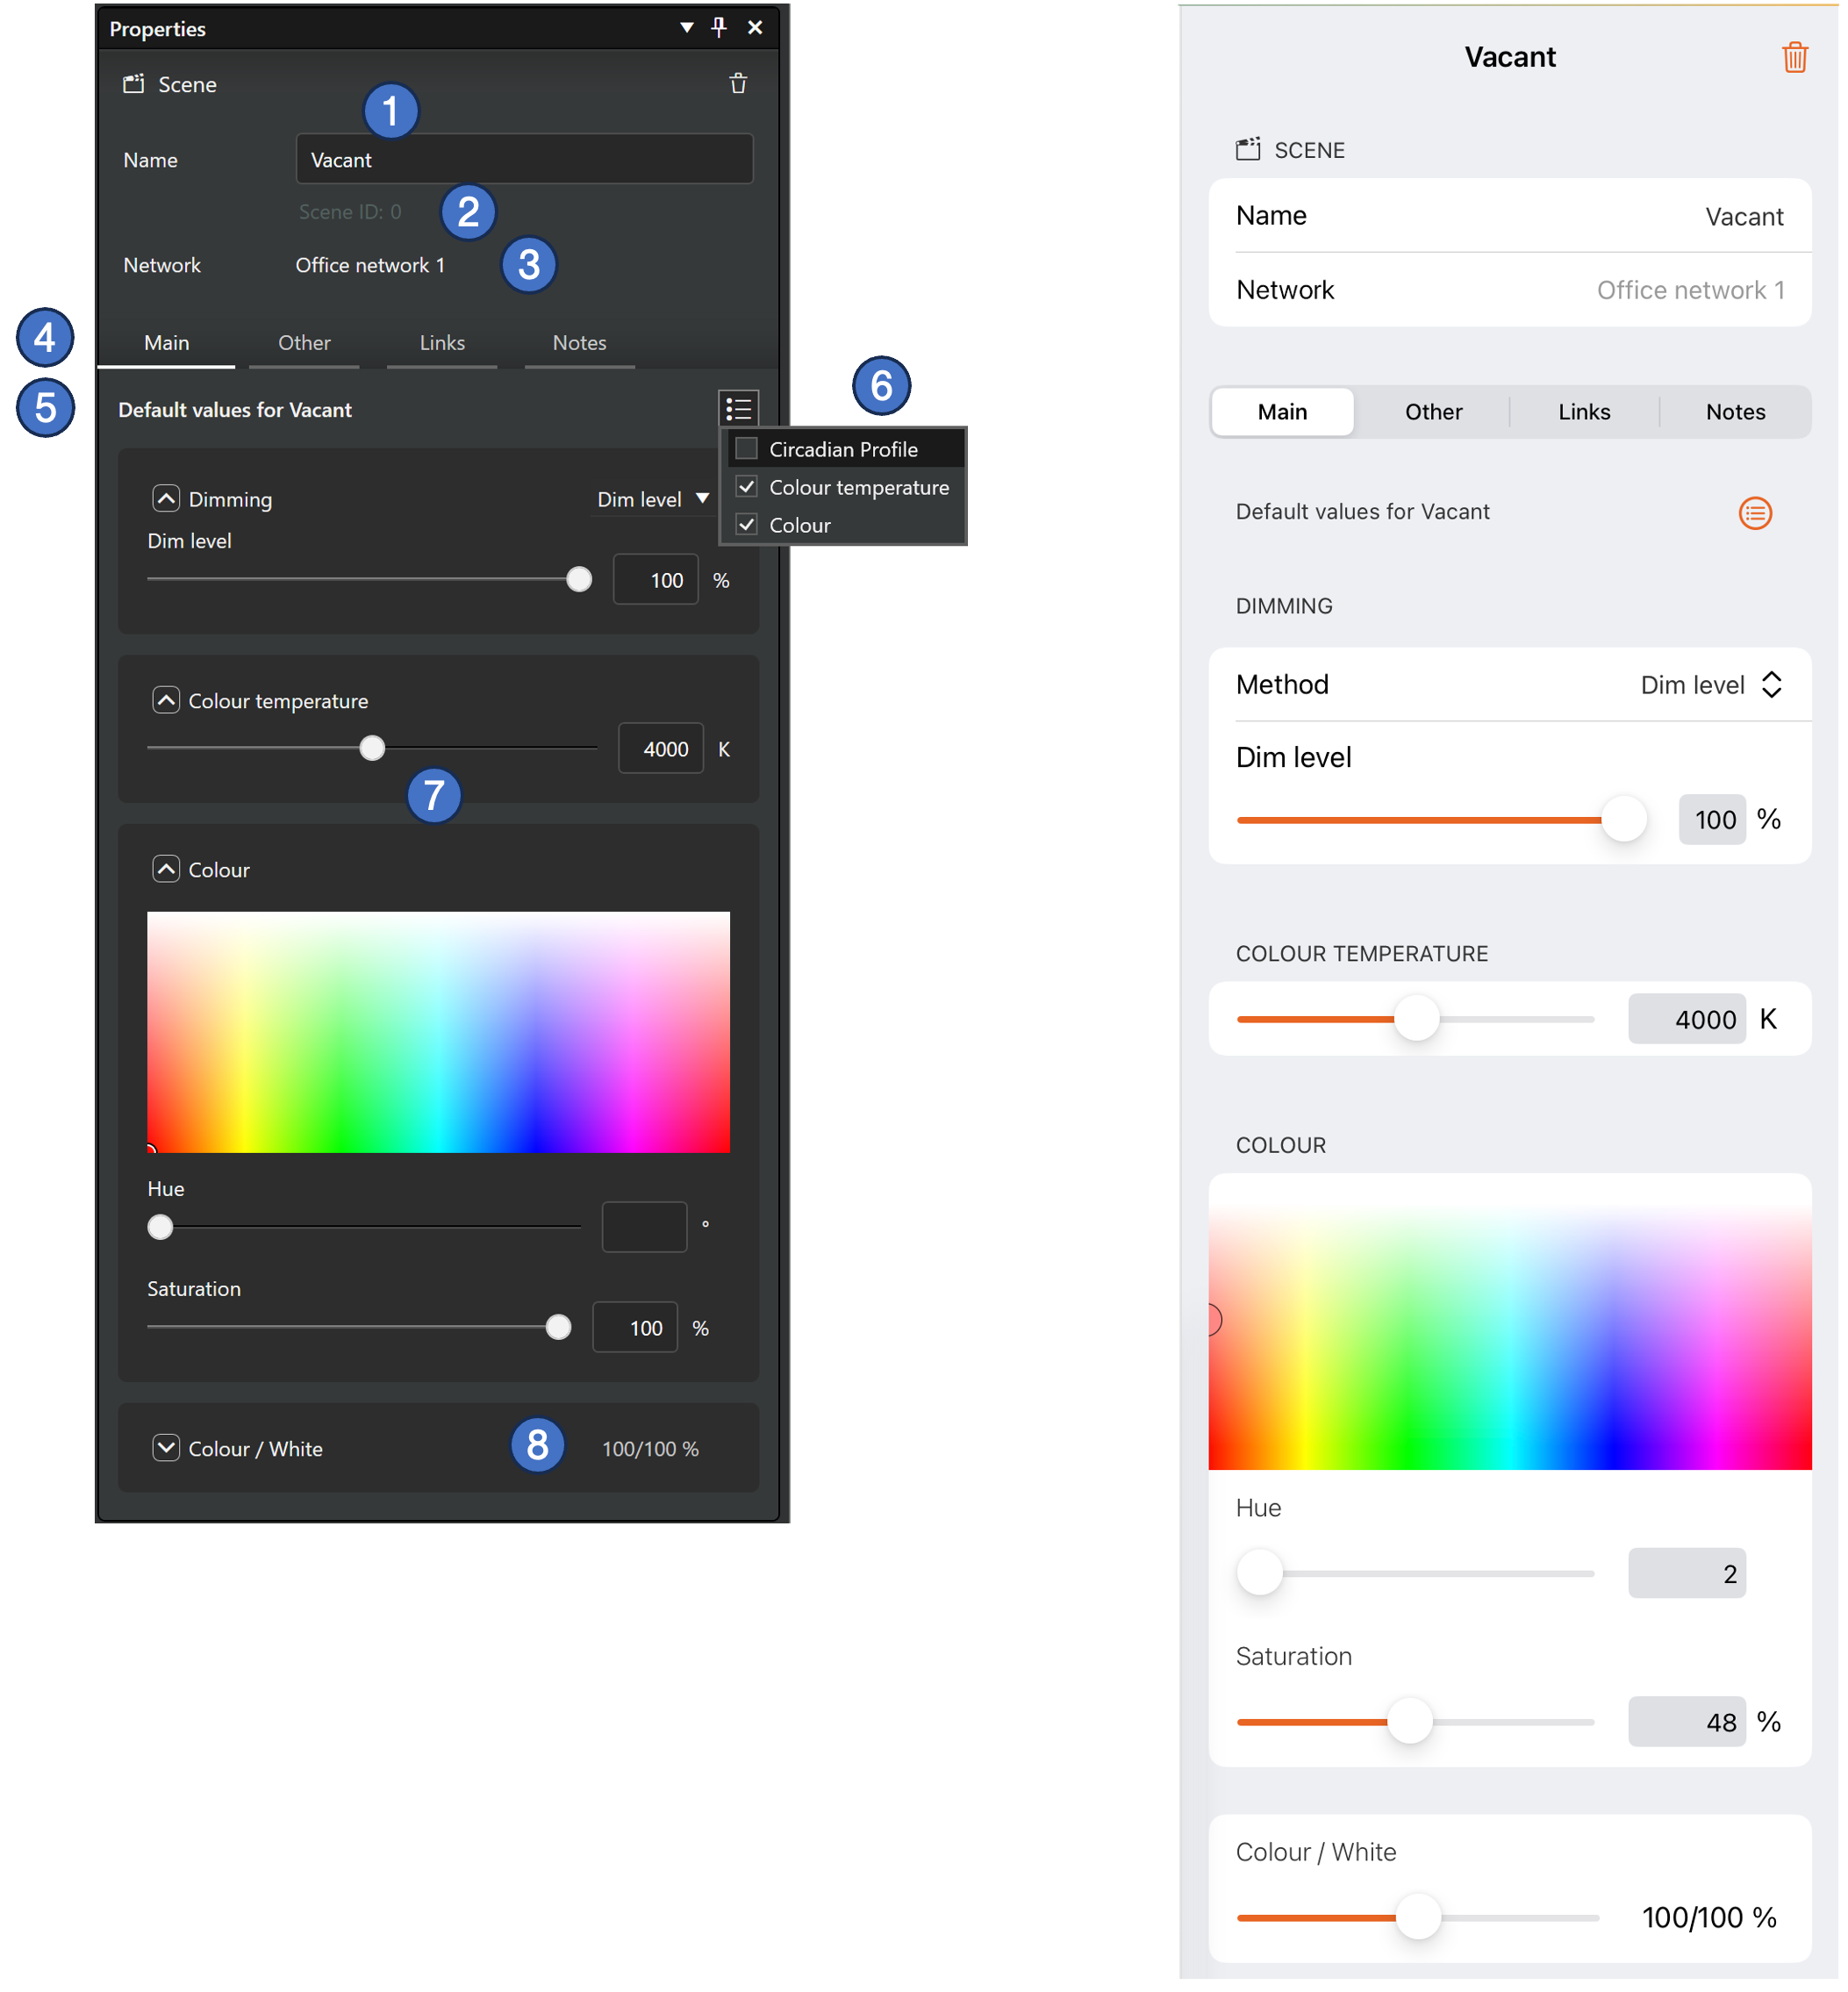
- Scene name (mandatory).
- Windows only: Scene ID.
- Network/Space where the scene belongs to (text depends on the network or space selected)
- Tabs for scene options:
- Main
- Dimming level (mandatory)
- Colour temperature (optional)
- Colour (optional)
- Other
- All other optional scene parameters.
- Initially the Other tab contains only Up/Down light ratio setting.
- Links
- List of controllers which are linked to use this scene.
- Notes
- Area for adding free text notes.
- Main
- Label displaying the current selection context.
- List for adding optional parameters to the scene.
- Each parameter can be adjusted either with a slider or by entering a numeric value directly to the text field.
- The Colour/White ratio setting is available only when both Colour Temperature and Colour parameters are used in the scene.
Group specific scene values
If a user wants to customize scene values for a specific group instead of using the default scene settings, they can select a single cell in the Scenes table and set the custom values in the Properties pane. This works similarly in both the Windows and iOS versions of Casambi Pro.
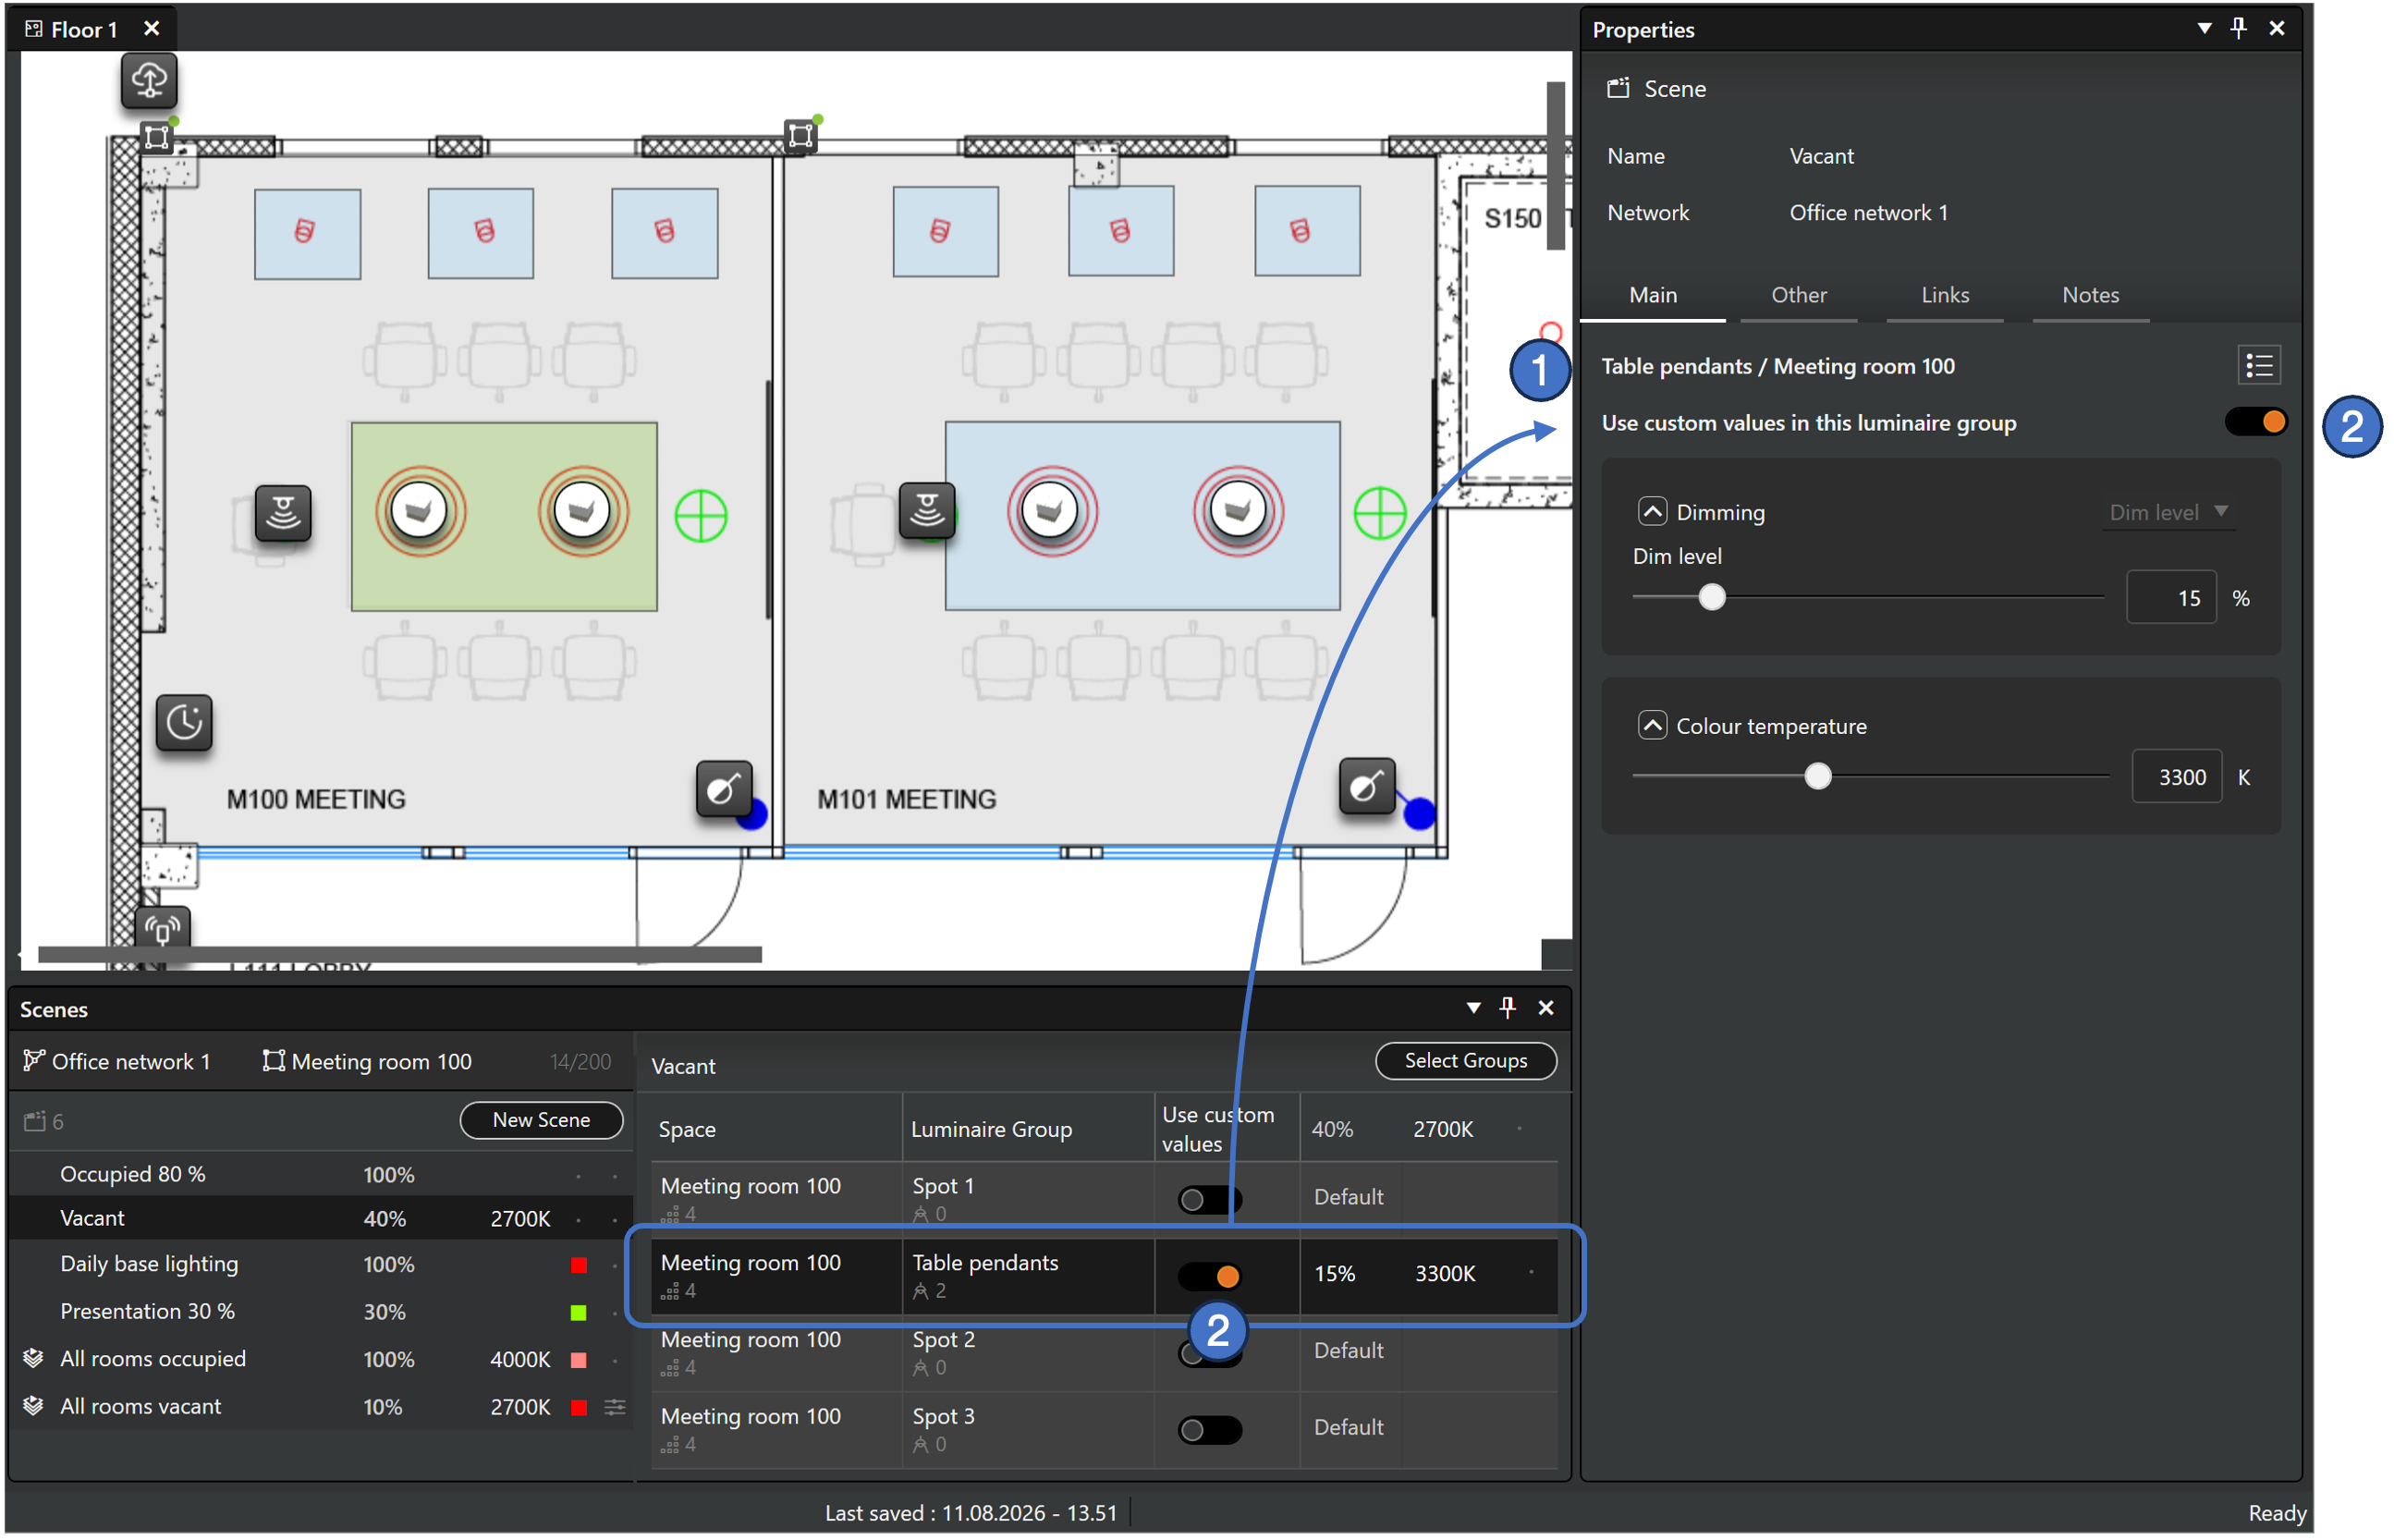
- When a single luminaire group row is selected from the group list, the current selection context is displayed at the top of the Main tab.
- Use Custom Values toggle.
- When this is switched Off, luminaires in the luminaire group follow scene's default values
- When this is switched On, custom parameter values can be applied to the luminaire group.
If dimming or color temperature is controlled by a circadian curve in the scene defaults, custom values cannot be applied to individual luminaire groups.