Daylight controlled dimming
How It Operates
In Casambi Pro, the Constant Light operation mode maintains a specified target lux level using a closed-loop feedback system. The light sensor measures the ambient illuminance in the space — which includes the light emitted by the controlled luminaires — and dynamically dims or brightens the active scene to reach and sustain the target level.
Once activated, the Casambi sensor continuously monitors the combined artificial and natural light in the room:
- When natural daylight enters, the sensor detects a rise above the target level and automatically dims the luminaires down toward the minimum dim level.
- When daylight fades, the luminaires automatically brighten back up toward the target level to keep overall illuminance consistent.
Daylight control scene properties
- Windows
- iOS
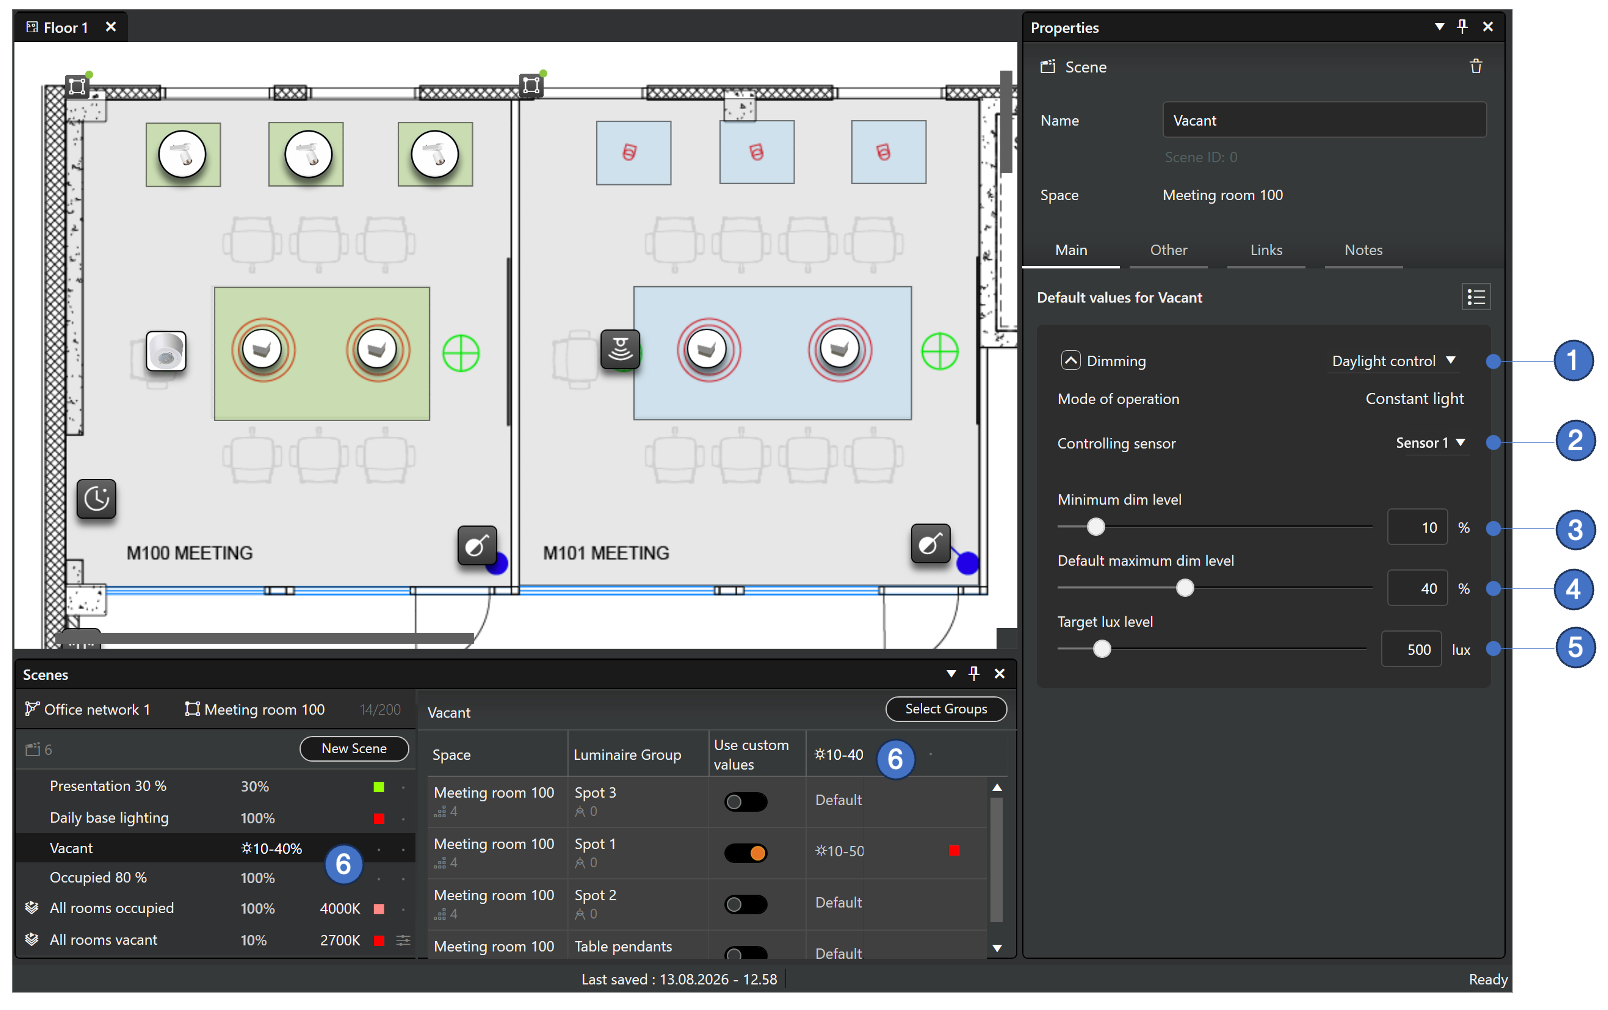
-
Dimming method selection between Dim value or Daylight control.
-
Selection of lux sensor which is used for daylight controlling. Note, that in Casambi Pro, only one sensor can be selected.
-
Minimum dimming level setting.
-
Default maximum dimming level setting.
-
Target lux level. This value can be manually entered or adjusted in real environment with the Casambi Pro for iPad when the real lux sensor and luminaires are present.
-
When a scene is daylight controlled, the Max-Min range is displayed in the scene table.
- The Minimum dim level (%) parameter is calculated relative to the selected scene's target level. For example, if the minimum dim level is set to 10% and the scene's maximum level is 50%, the absolute minimum output for the constant light scene will be 5% (10% of 50%).
- Only one sensor can be selected for controlling the dimming in a scene.
- Casambi Pro does not support reading values only from luminaires with integrated or dedicated sensors.
- In Casambi Pro, some parameters familiar from the Casambi App are using static values and they are not adjustable in the user interface:
- Change rate: 2,5 seconds
- Tolerance: 15%
- Unlike in the Casambi App, there is no Activation Level graph available in Casambi Pro.
- Limitation with spaces linked to a space template:
- The target lux level is manually set in the space template editor in Casambi Pro for Windows.
- Each templated space uses the same target lux value.
- If you need to adjust the desired illuminance levels individually for each templated space in Casambi Pro for iOS, the spaces must be first unlinked from the parent template.
The daylight control dimming levels can be set on iOS in a separate mode, where the luminaires’ dimming level can first be set in real time to the desired value and then those values are saved to the configuration.
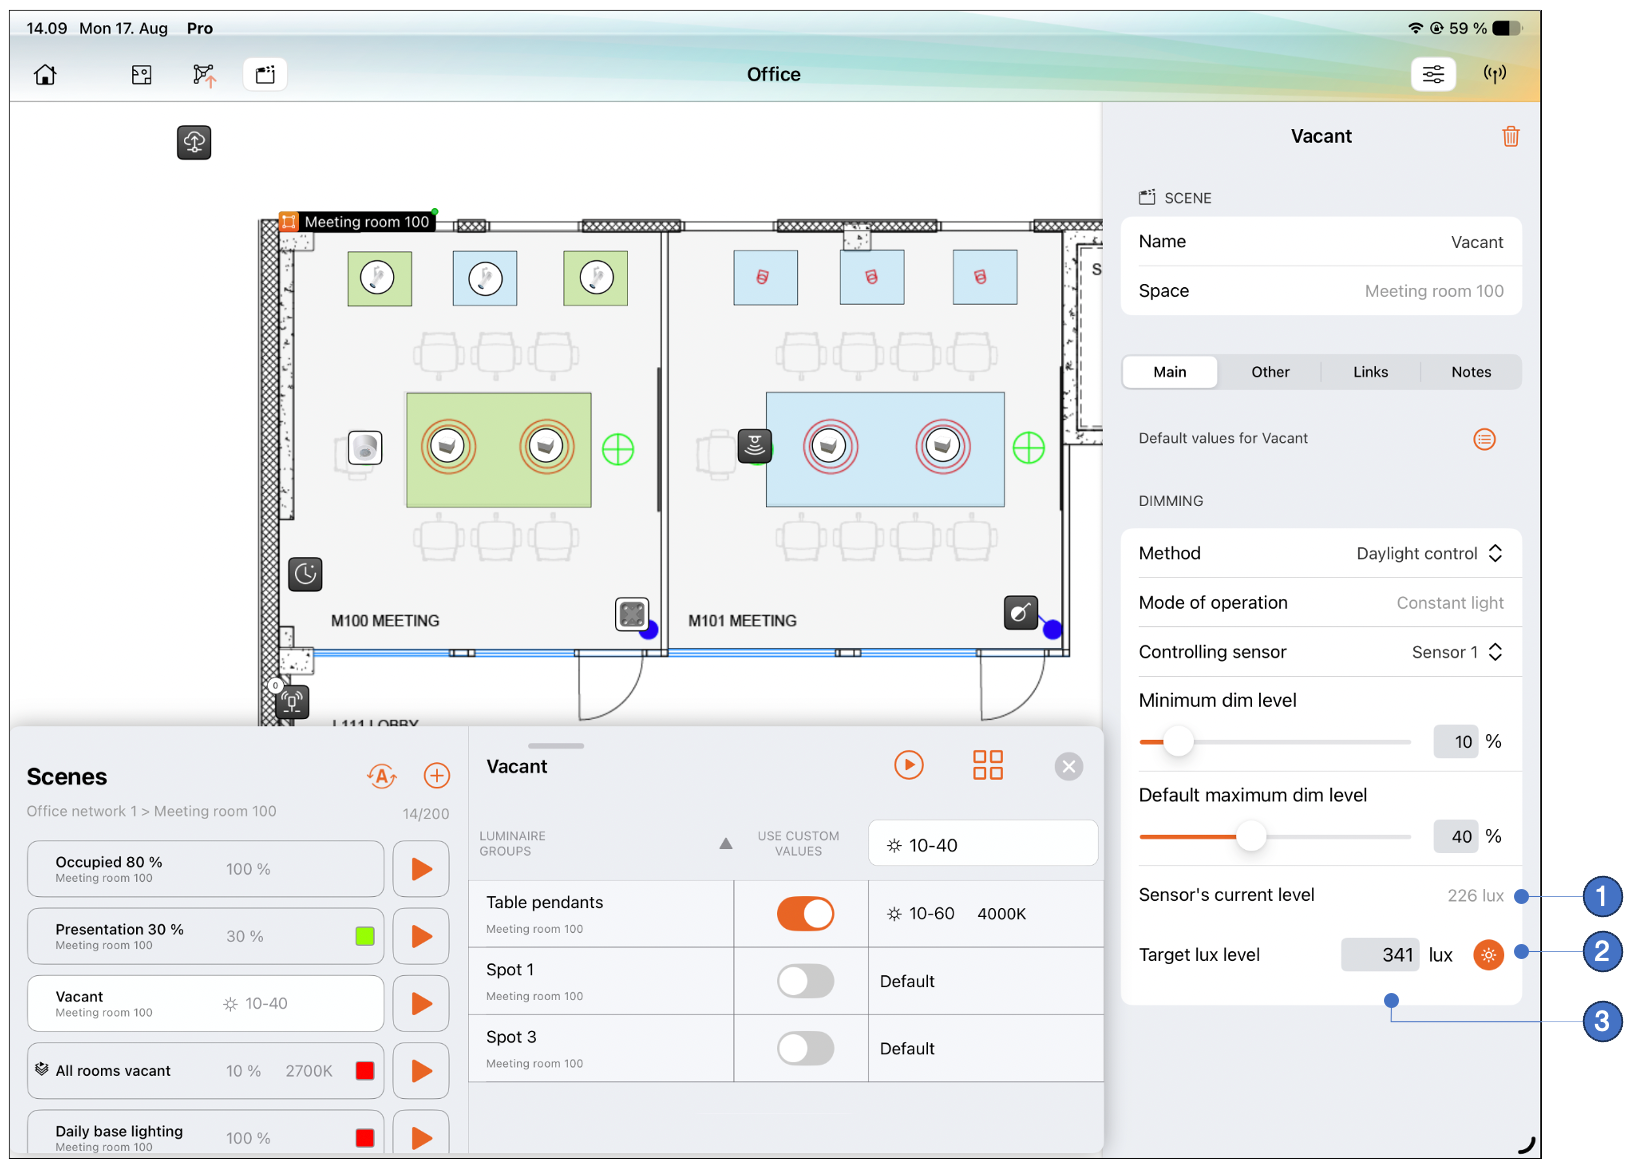
- The current lux level for the selected controlling sensor. The value is displayed if the sensor is within the bluetooth range of the used iOS device.
- The Adjust button opens the Adjustment view where the luminance levels of the luminaires can be set to desired level in real time.
- After the targeted luminance level has been adjusted, the target lux level is shown in the properties. This value can also be entered manually.
With spaces that are linked to a space template, the adjustment mode is not available. Target lux level must be changed in the space template editor in Casambi Pro for Windows.
Daylight scene adjustment view
In the daylight scene adjustment view, the iPad is connected to the network and sensor’s and luminaires’ statuses are displayed in real time. Here each group’s dimming level can be adjusted to the desired luminance level.
Adjustment view when a space is selected:
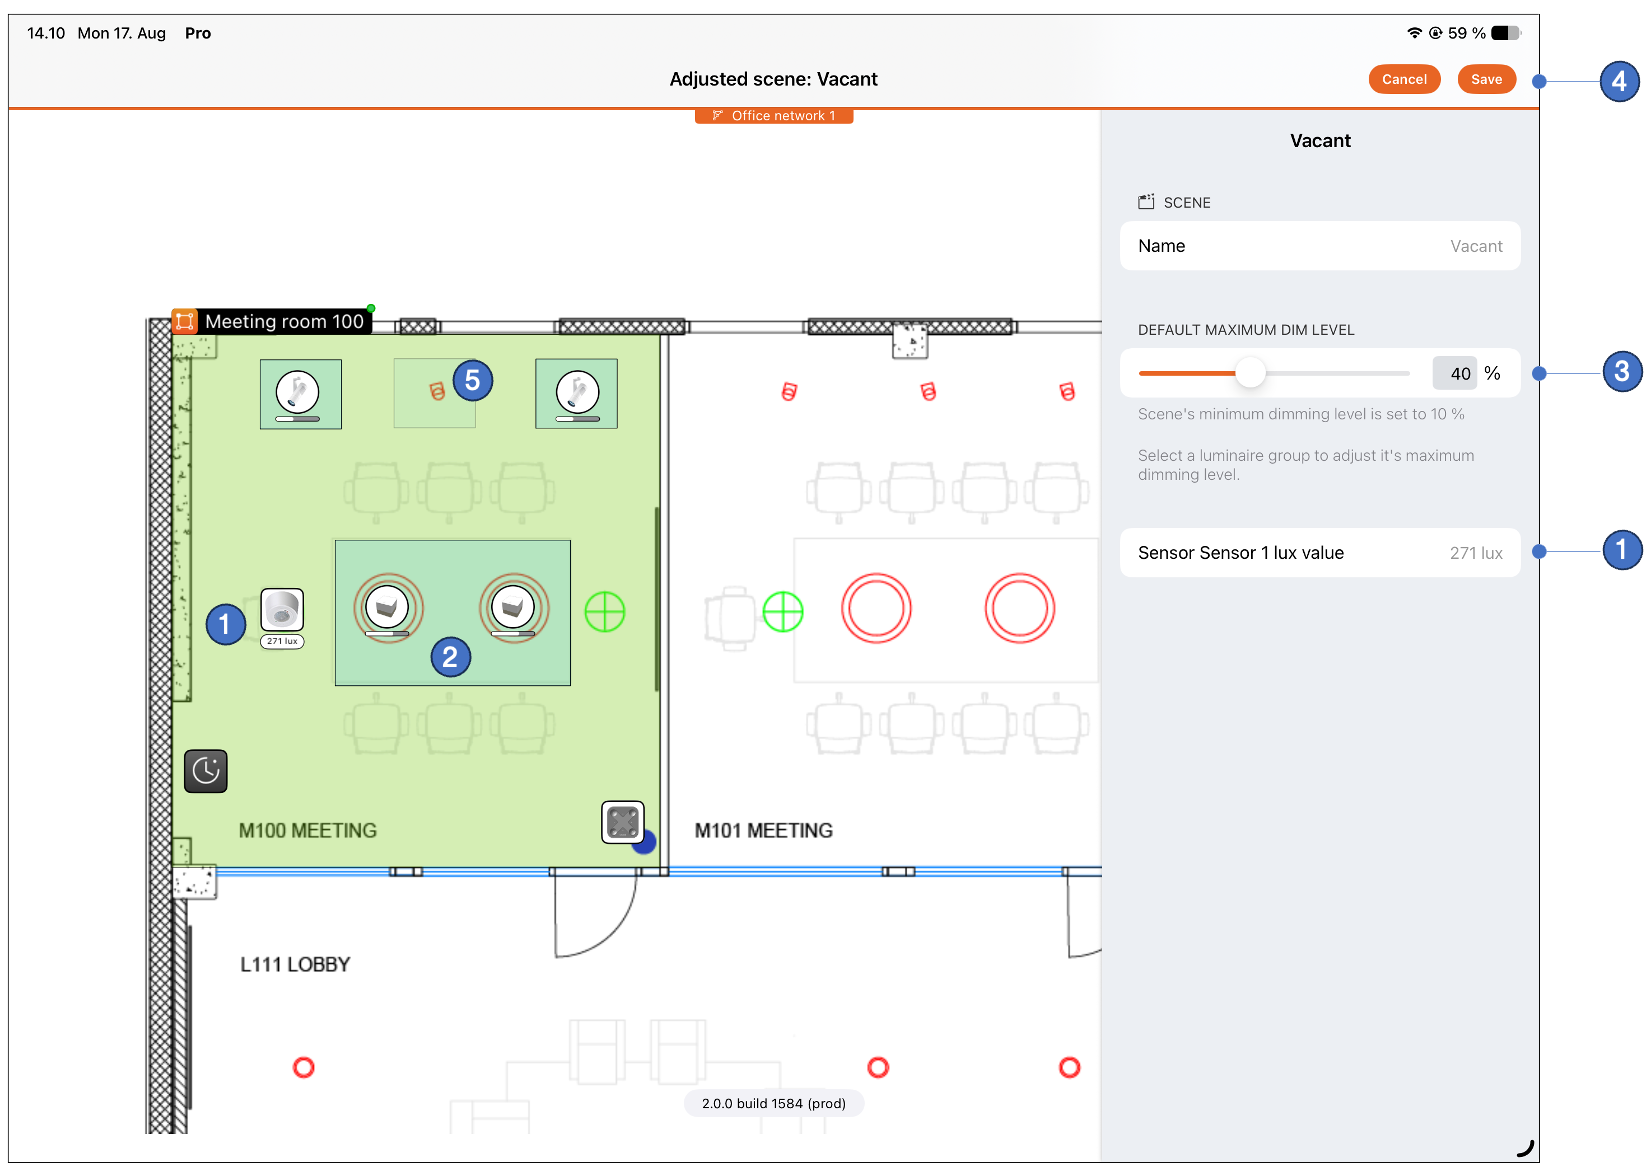
- Sensor’s lux levels are displayed in real time.
- Luminaire’s dimming level is shown with indicator bars under the luminaire elements in each group.
- Scene’s default maximum dimming level can be adjusted when the space is selected. By selecting a single group, its dimming levels in the scene can be adjusted individually. Adjusting the dimming level of the group will affect the controlling lux sensor's detected lux value.
- When the desired dimming levels have been adjusted, the settings can be saved by tapping the Save button. When this is done, the scene adjustment view is closed, and the user is returned to the main edit view.
- If a group is not part of the scene (using the "Not used" value), it is not shown in this view.
Adjustment view when a luminaire group is selected:
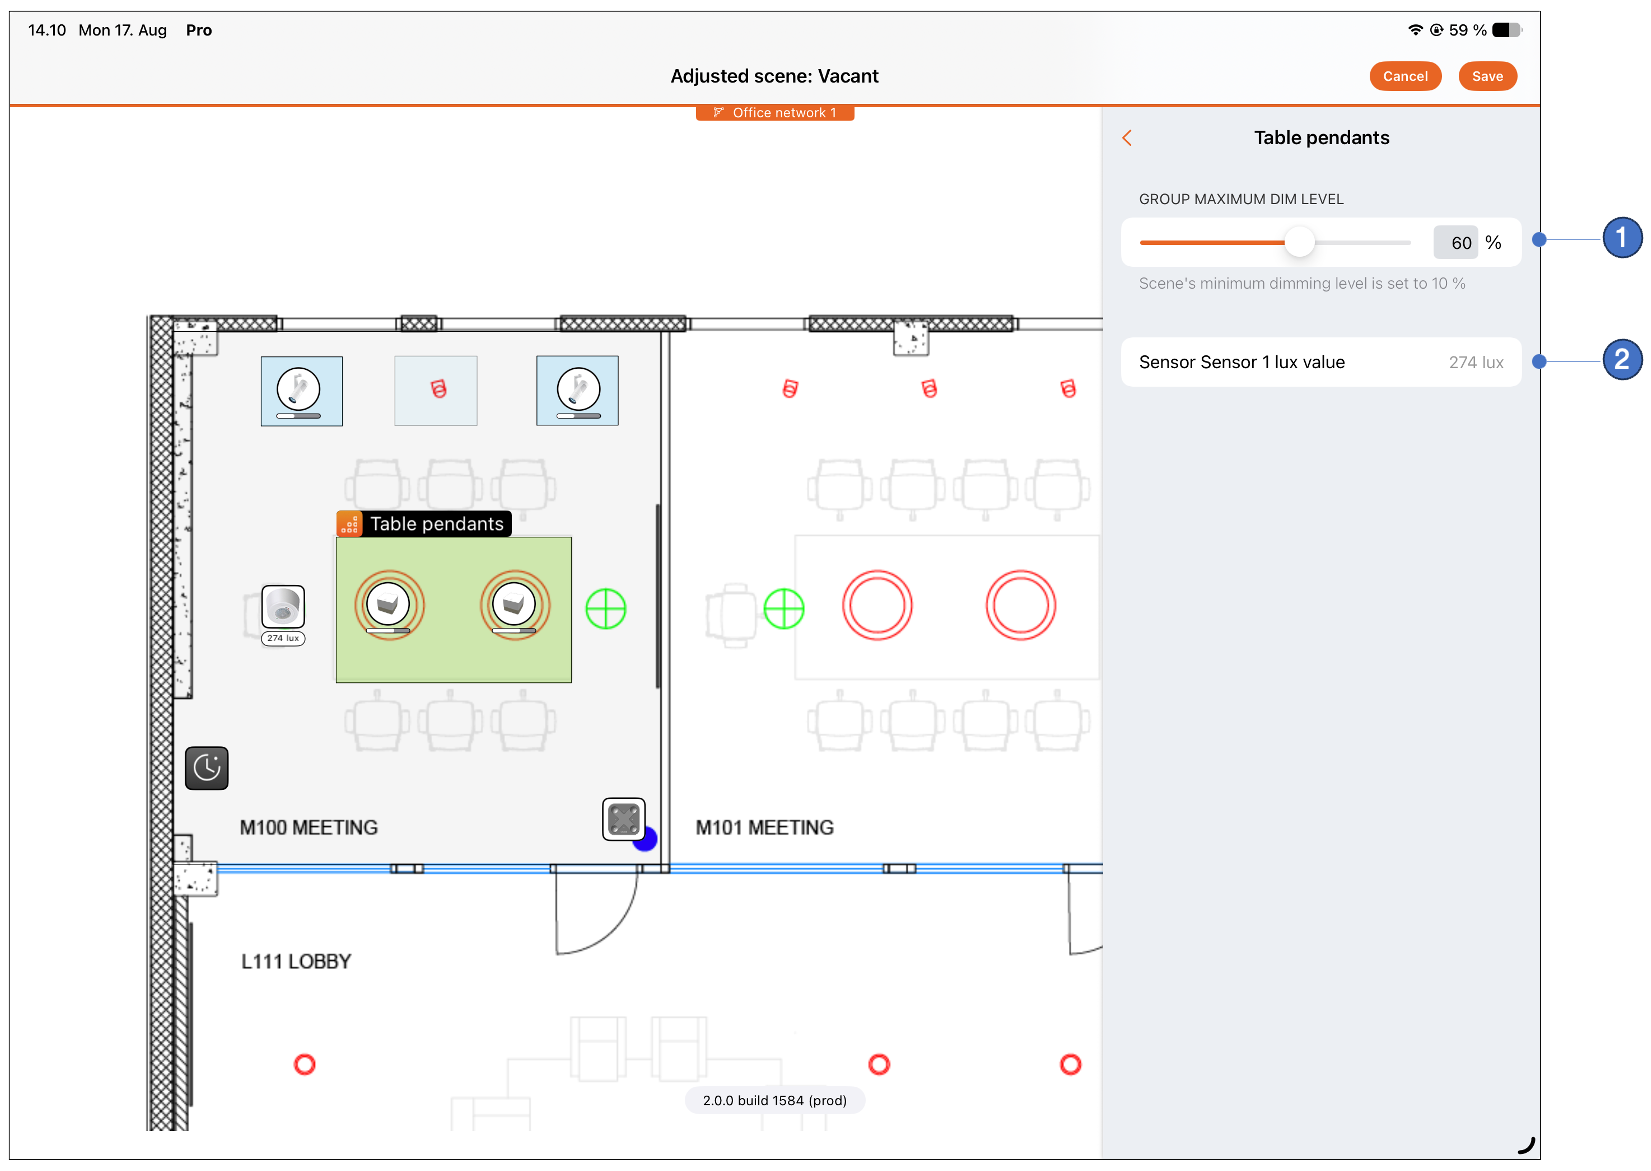
- Luminaire group's preferred maximum dimming level when using the local dimming value. If the selected group is using scene's default values, this dimming bar is dimmed, indicating the default dimming value.
- Sensor’s lux levels are displayed in real time.
- The Minimum dim level (%) parameter is calculated relative to the selected scene's target level. For example, if the minimum dim level is set to 10% and the scene's maximum level is 50%, the absolute minimum output for the constant light scene will be 5% (10% of 50%).
- Only one sensor can be selected for controlling the dimming in a scene.
- Casambi Pro does not support reading values only from luminaires with integrated or dedicated sensors.
- In Casambi Pro, some parameters familiar from the Casambi App are using static values and they are not adjustable in the user interface:
- Change rate: 2,5 seconds
- Tolerance: 15%
- Unlike in the Casambi App, there is no Activation Level graph available in Casambi Pro.
- Limitation with spaces linked to a space template:
- The target lux level is manually set in the space template editor in Casambi Pro for Windows.
- Each templated space uses the same target lux value.
- If you need to adjust the desired illuminance levels individually for each templated space in Casambi Pro for iOS, the spaces must be first unlinked from the parent template.
Setting Up a Daylight-Controlled Scene in Casambi Pro
A daylight-controlled scene automatically dims or brightens luminaires based on the amount of light measured in the room. This guide explains how to set up and calibrate a daylight scene using Casambi Pro.
Before You Begin
- Hardware Requirements: Ensure your Casambi BLE network has at least one paired sensor capable of measuring lux levels, and have a handheld lux meter ready.
- Understand the Sensor Reading: A ceiling- or fixture-mounted lux sensor measures reflected light and will not show the same value as a handheld lux meter placed directly on a desk or working surface.
- Optimal Timing: Perform this setup during evening or night hours (or in a room with blinds completely closed) to eliminate external daylight interference while setting baseline levels.
- Casambi Pro Modes & Limitations:
- Casambi Pro utilizes Constant Light mode.
- In Casambi Pro, internal settings for rate of change and tolerance are pre-configured; individual sensor calibration, tolerance, or sensitivity settings are not manually configurable (unlike in the standard Casambi App).
Step-by-Step Instructions
Platform Availability:
Steps 1–3 can be performed in either Casambi Pro for Windows or Casambi Pro for iOS. Step 4 requires an active Bluetooth connection to the mesh network and must be completed using Casambi Pro for iOS.
1. Open the Space and Create/Select a Scene
- Open your project in Casambi Pro (Windows or iPad).
- Select the Space where your luminaires and sensor are located.
- In the Scenes pane, select an existing scene or create a new scene (e.g., "Worklight Daylight").
2. Switch Dimming Control to Daylight Control
- In the Properties pane for the selected scene, locate the Dimming section.
- Change the dimming method from Dim value (static) to Daylight control.
3. Select the Controlling Lux Sensor
- In the sensor dropdown list, select the specific lux sensor you want to use for this scene.
note
- Only one sensor can be chosen per daylight-controlled scene in Casambi Pro.
- By default, sensors' lux sensing feature is turned off, until it is used in a daylight controlled scene. This reduces the excess data traffic in the network.
- Set the desired Minimum Dim Level (the lowest level the luminaires will reach in bright daylight) and Maximum Dim Level (the ceiling for maximum luminaire output).
4. Calibrate the Target Lux Level On-Site (Using Casambi Pro for iPad)
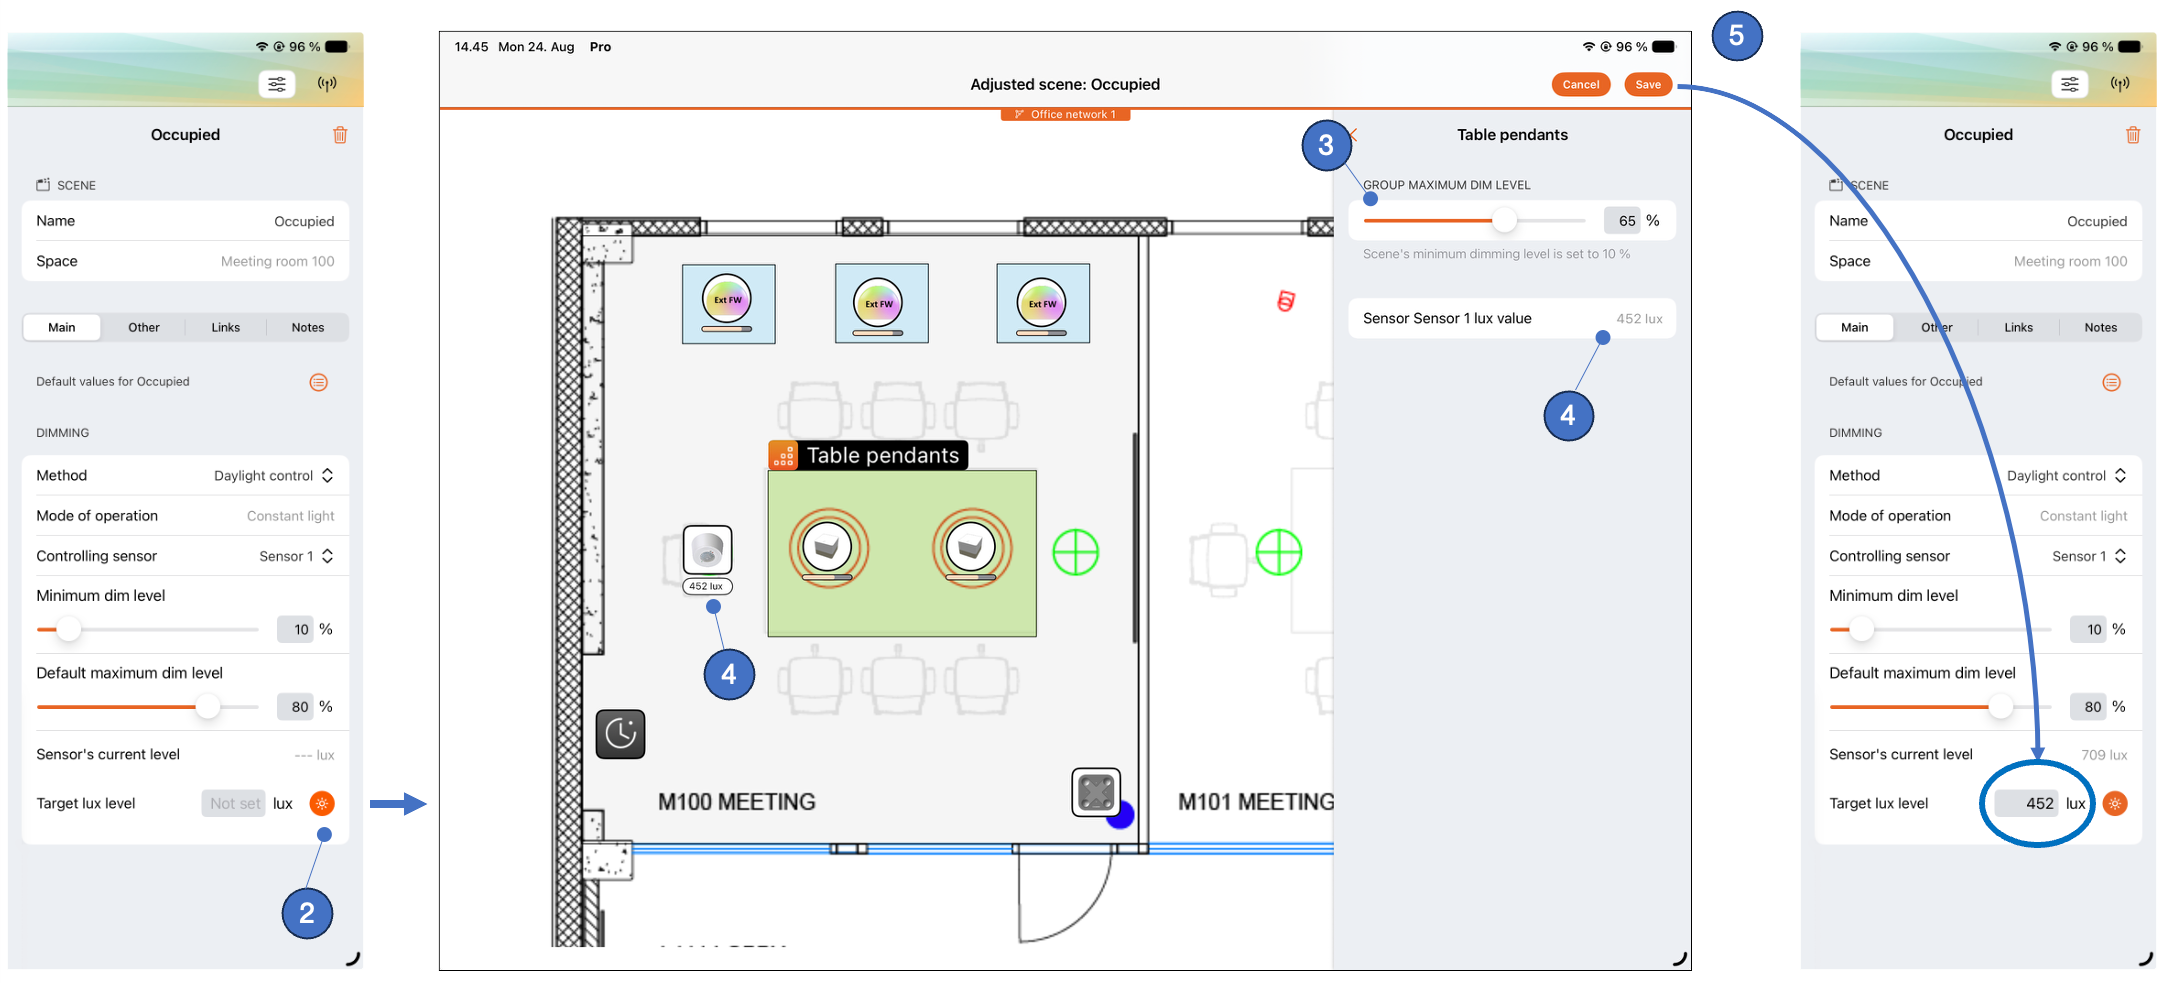
- Position your handheld lux meter on the main working surface (e.g., tabletop or desk).
- On the iPad/iPhone, tap the Adjust button next to the Target lux level reading, to enter the live Adjustment View. This button is disabled if a sensor is not selected.
- Adjust the real-time slider for each luminaire group(s) until your handheld meter on the surface shows your desired target illuminance (for example, 500 lux on the table).
- Look at the real-time reading sent by the ceiling/fixture lux sensor on the iPad screen.
- Save the adjustment. The value measured by the Casambi sensor at that moment will automatically become the scene’s Target Lux Level. Note, that this value can also be entered manually.