Creating a circadian profile
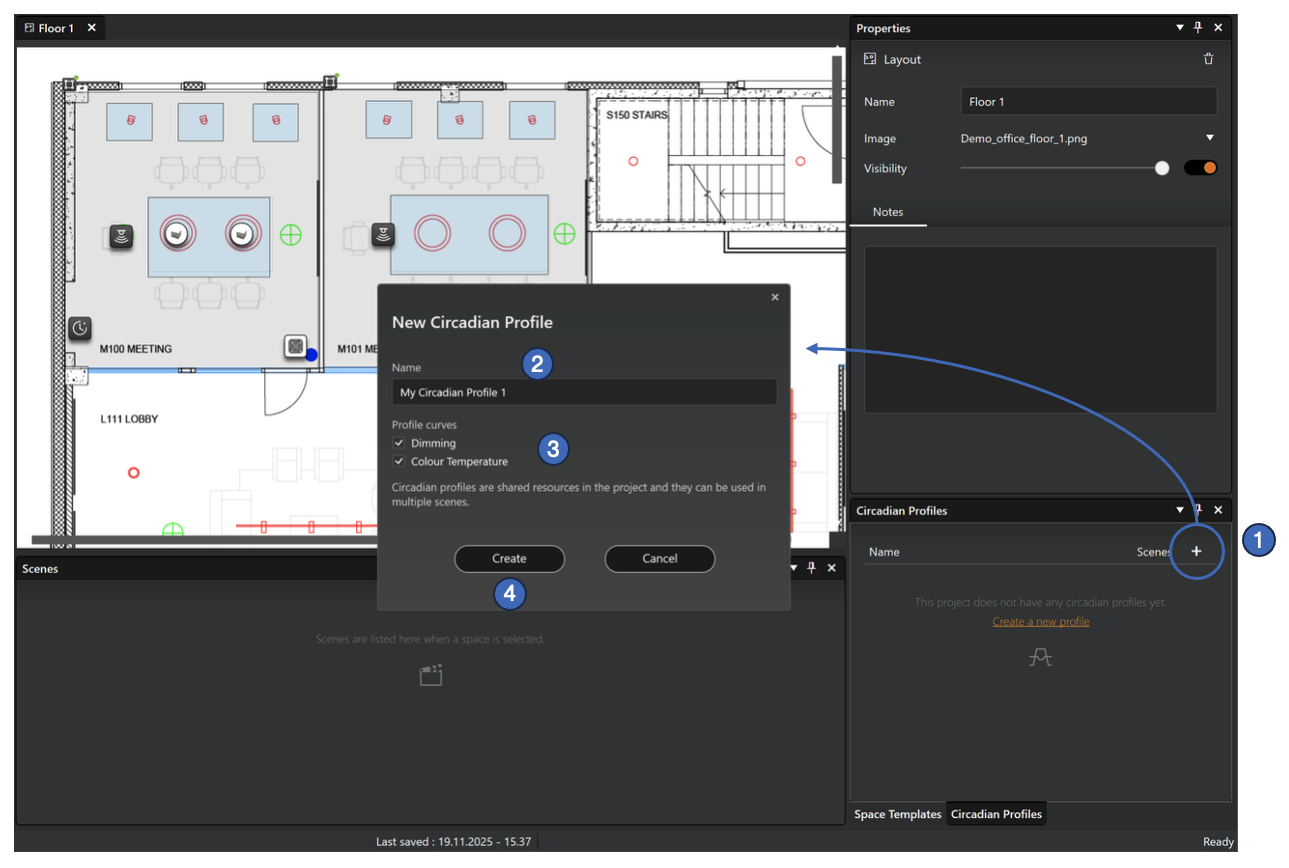
- In the Circadian Profiles pane, click the Add button (a plus icon) in the top right of the pane. The New Circadian Profile dialog opens.
- Enter a name for the new profile (mandatory)
- Select what curve(s) to include in the circadian profile. A profile must have at least one curve:
- Dimming only: Configures a dimming curve. When applied to a scene, luminaire dimming levels will adjust automatically over time according to the curve.
- Colour temperature only: Configures a colour temperature curve. When applied to a scene, the colour temperature of tuneable white luminaires will adjust automatically over time according to the curve.
- Both Colour temperature and Dimming: Configures both curves simultaneously. When applied to a scene, both the colour temperature and dimming levels of tuneable white luminaires will adjust automatically over time according to the curves.
- Click the Create button to enter the Circadian Profile Editor.
The circadian profile editor in Casambi Pro for Windows
Opening the editor
The profile editor is opened when a new circadian profile is created, or when user enters it to edit a profile.
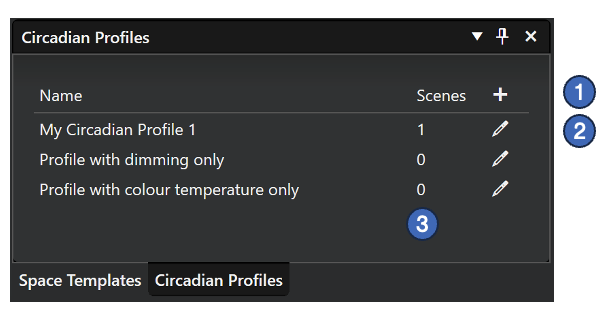
Options in the Circadian Profiles pane
- Create new circadian profile
- Edit circadian profile. The profile editor can also be opened from the property pane when a profile is selected in this list.
- Numbers in the Scenes column indicate the number of scenes where each scene has been used.
Editor window
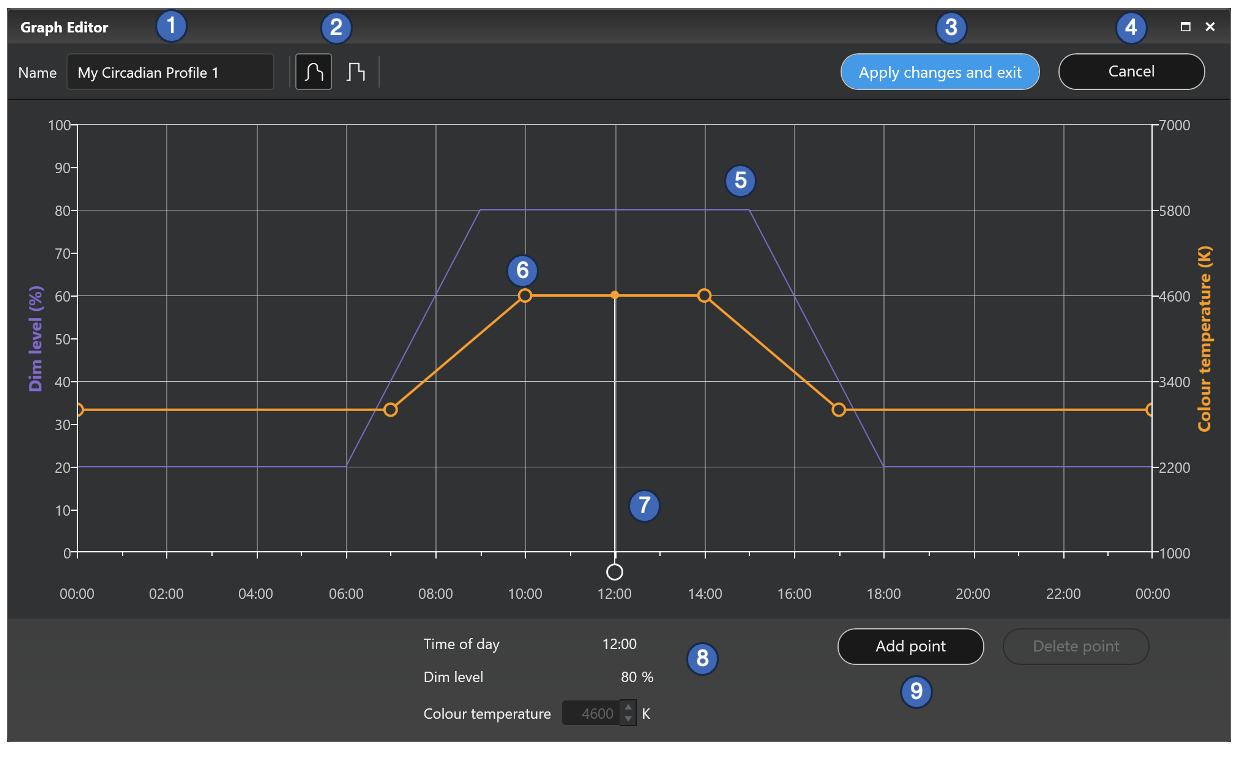
Editing a circadian profile:
- Profile Name: Displays or edits the name of the profile (mandatory).
- Graph Format: Toggle between a smooth curve format (Curve) and a stepped format (Steps).
- Apply changes and exit: Saves all modifications and automatically updates all linked scenes.
- Cancel: Discards all unsaved changes and exits the editor.
- Profile curves for the dimming and colour temperature, depending which ones have been included in the current circadian profile
- Dimming curve: Rendered in purple, with its percentage scale on the left axis.
- Colour temperature curve: Rendered in orange, with its Kelvin scale on the right axis.
- When both curves are present, only one is active at a time. Click a curve directly in the graph to make it active.
- Curve Adjustment: Adjust a curve by selecting and dragging its adjustment (corner) points:
- There can be maximum of 25 adjustment points in a circadian profile curve.
- Minimum time interval between adjustment points is 6 minutes.
- The line cursor can be moved by the white circular handle.
- When the cursor is moved, the time value will be adjusted.
- If the Add Point button is clicked, a new curve adjustment point is added to the curve position where the line is pointing.
- Another way to create new corner points is to click a curve line segment with the mouse.
- Values for the adjustable parameters are displayed below the graph
- Time of day is adjusted only by moving the adjustment points in the graph.
- Dim level value displays
- The dimming level percentage value at the point where the white line cursor is, or
- The dimming value in a dimming curve corner point when the point is selected. In this case, the dimming value can be entered directly to the input field.
- Colour temperature value displays
- The Kelvin value at the point where the white line cursor is, or
- The Kelvin value in a colour temperature curve corner point when the point is selected. In this case, the colour temperature value can be entered directly to the input field.
- Add Point and Delete Point buttons.
- Clicking the Add Point button creates a new adjustment point to the active curve, to the current white line cursor position.
- Clicking the Delete Point removes currently selected adjustment point. If no point is selected, this button is disabled.
Circadian profile properties
When a circadian profile is selected in the Circadian profile pane, its properties are displayed in the property pane.
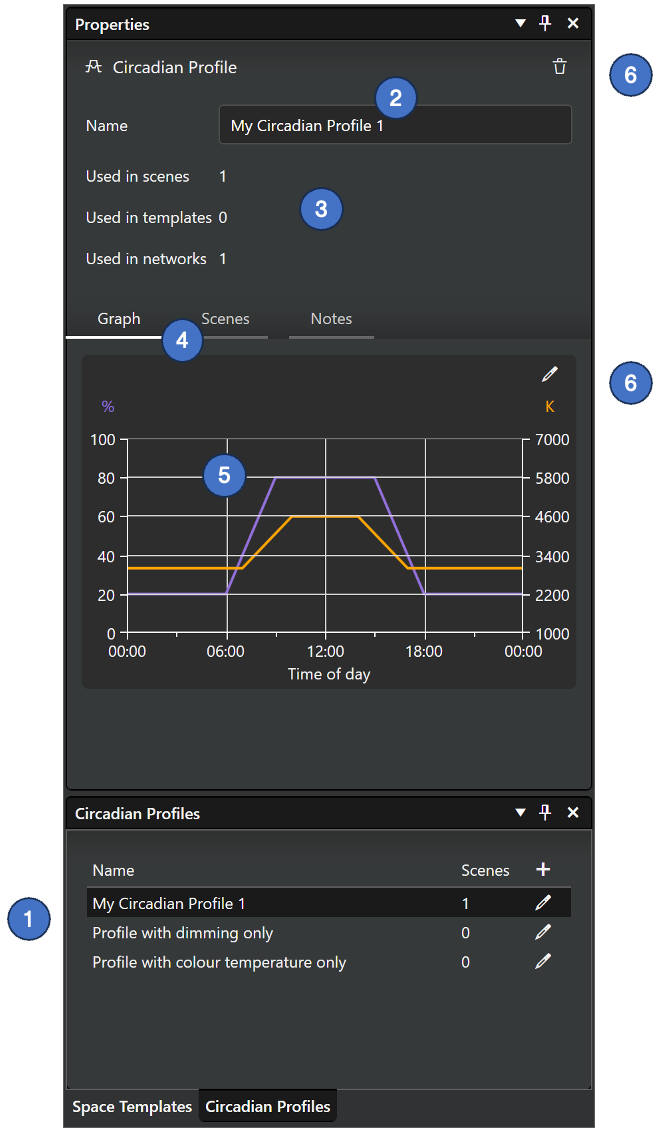
- When a circadian profile row is tapped in the Circadian Profiles pane, the selected profile's properties are displayed in the Properties pane.
- Name of the profile: The name can be edited either in the Properties pane or in the Circadian Property Editor.
- Information about how the selected circadian profile is used.
- The Graph tab shows the profile preview, and the Scenes tab lists the scenes where the profile is used.
- Preview of the selected profile.
- Edit button. Clicking this button opens the Circadian Profile Editor.
- Delete button. Deletes the selected circadian profile. Note that if a profile is deleted, it is removed from all scenes where it is used.
Applying a circadian profiles to scenes
When there are circadian profiles defined in the project, they can be utilized in a circadian scene. When applied to a scene, depending on what curves the profile has, the colour temperature of tuneable white luminaires and their dimming level will both change automatically over time according to the profile graph settings.
See the Circadian Profiles in Scenes for details on how to apply profiles.
If you edit a graph that has been used in scene/s, the change will affect all related scene/s.