Daylight sensor calibration and set up
In most cases, the calibration of a daylight sensor will not be required as the sensor technology is most likely accurate enough. However, if calibration is required, it must first be determined whether the sensor should be calibrated to measure incidental or reflected light.
Site specific variations due to differences in sensor specifications, locations, orientation, and the available natural and artificial lighting in an area, mean that calibrating a Casambi-enabled sensor ensures the lux value measured by the sensor is interpreted by the Casambi system into a corrected lux value for the application.
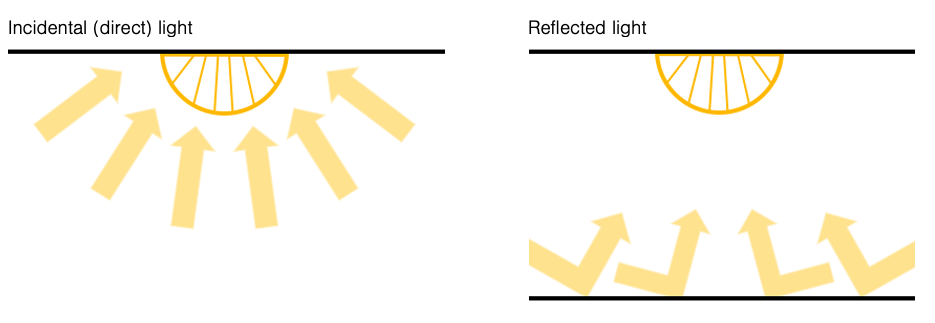
Calibrating a sensor for incidental (direct) light
Incidental light is the total amount of light being received by the sensor. i.e., the light that falls on the surface of the sensor lens, that is gathered from the entire area where the sensor is located.
This is the default measurement and the lux reading that a sensor will display in the Casambi app.
Usually this will not require recalibration. However, sensor limitations may result in its inability to measure the full range of lux it is exposed to. This may occur for example if a sensor is mounted in direct sunlight.
If calibration is required, follow the steps below to calibrate the sensor reading in the Casambi app.
- Place a lux meter as close as possible to the lens of the Casambi-enabled sensor, ensuring that the lux meter's lens is pointing exactly in the same direction as the lens of the Casambi sensor.
- Measure the amount of light received by the lux meter.
- Open your network in the Casambi app and navigate to More > Sensors.
- Select the desired sensor.
- Select Daylight sensor.
- Select Current value and enter the value of lux measured by your lux meter.
- Tap on OK and then on Done to complete the calibration.
- Tap on Back to return to the sensors view.
When using the sensor in any of the daylight scene modes (Mode of operation) that are configurable in the Casambi app, the lux value used for any adjustments will be the corrected value of lux being received by the sensor itself. So, if the sensor is calibrated for direct light, using the Closed loop mode for constant light control will try to maintain an overall total amount of light for the entire area the sensor is in.
Calibrating a sensor for reflected light
Reflected light is light that is being received on the surface of an object, or objects placed directly opposite the lens of the Casambi-enabled sensor. For example, the amount of light falling on the surface of a desk in an office.
If you would like to try to maintain a specific amount of light on that object or surface, you may need to calibrate the sensor lux value shown in the Casambi app. It should also be noted that using a Casambi-enabled sensor in this way reduces the accuracy of the lux measurement, since you are only applying a correction factor to the actual measured lux value and thus the accuracy decreases over the entire dimmed range and due to the “target measurement point” being further from the surface of the sensor lens.
To calibrate for this type of use:
- Place a lux meter on the surface of the desired object with the lens of the lux meter directed straight at the lens of the Casambi-enabled sensor.
- Measure the amount of light received by the lux meter (this value is likely to differ significantly from the lux value received by the Casambi-enabled sensor displayed in the app).
- Open your network in the Casambi app and navigate to More > Sensors.
- Select the desired sensor.
- Select Daylight sensor.
- Select Current value and enter the value of lux measured by your lux meter.
- Tap on OK and then on Done to complete the calibration.
- Tap on Back to return to the Sensors view.
If you are now using the Closed loop daylight mode in a scene, the Casambi-enabled sensor will attempt to maintain a constant amount of light on the surface of the object, for example the surface of a desk that is directly below the sensor.
Calibrating the sensor for reflected light has been shown to produce less optimal results in Closed loop mode. It is better to set the target value in a closed loop scene to be the lux value actually measured by the sensor.
i.e., If you want to configure a closed loop scene to achieve 500lx on a surface:
- Place a lux meter on the surface below the sensor
- Dim the lighting to achieve the desired lux on the surface (500lx)
- In the Casambi app, read the lux value being measured by the sensor (this may be, for example, 400lx)
- Use the sensor lux value (400lx) as the Target lux value in the Closed loop daylight scene
When calibrating a sensor to control the amount of artificial light in an area, it is important to remember to exclude as much natural light from the area as possible during the calibration. Ideally there should be no natural light. It would be best to try to finish the installation as much as possible before measuring, so that all carpets, desks and other items are in their final place. This enables the most accurate calibration and the best dimming range for the controlled luminaires in the widest possible variety of situations.
Regardless of the calibration method chosen, it is necessary to consider if one or multiple sensors distributed through an area would be required to archive the best possible lighting control solution. Each individual sensor may need calibration for the lighting conditions applicable to their specific area of installation.
Also note that when multiple daylight sensors are configured to control the same luminaires in an area, the lux values used by the Casambi app will be the average of all sensor measured lux values.
Sensitivity and Tolerance
Within the Daylight sensor settings, you will see options for adjusting the sensor Sensitivity and Tolerance.
The Sensitivity defines how quickly the sensor will react to changes in illumination. The higher the sensitivity, the faster the reaction time. Lower sensitivities are usually chosen to avoid possibly annoying situations of luminaires dimming up and down every time a cloud happens to cover the sun for a few seconds.
The Tolerance defines how large the changes in measured lux value need to be before the sensor will react and adjust the lighting. A larger value requires larger measured lux changes.
Daylight gain
When configuring daylight control for an area, it is important to consider whether luminaires may need to be configured with a daylight gain offset to optimize the achieved dimming conditions. Daylight gain is mainly used, for example, if there are multiple luminaires in an area being controlled by a single daylight sensor.
Daylight gain is an estimate of the amount of available natural light that can be present in the same area that is illuminated by a single luminaire. For example, a luminaire installed next to a window may be in a position where the most natural light is available, and therefore achieve a daylight gain of 100%. A luminaire that is further from the window will not receive as much natural light that can affect the area being illuminated and will therefore have less daylight gain.
Configuring different daylight gains for the luminaires in an area would have the effect of providing a more consistent illumination throughout a room, if controlled by a single lux sensor. Luminaires installed near a window will dim to a lower level than luminaires situated further inside the room, but users of the area will perceive that there is a similar amount of total light available throughout all areas across the entire room.
A recommended method to determine the estimate of daylight gain for different areas would be to use a lux meter and take readings at different points without any artificial illumination being active (i.e., only natural light is available). The highest lux value can then be taken as 100% daylight gain and lower daylight gain percentages can be calculated on that basis.
Example of Daylight gain setting (Most natural light is near the window)
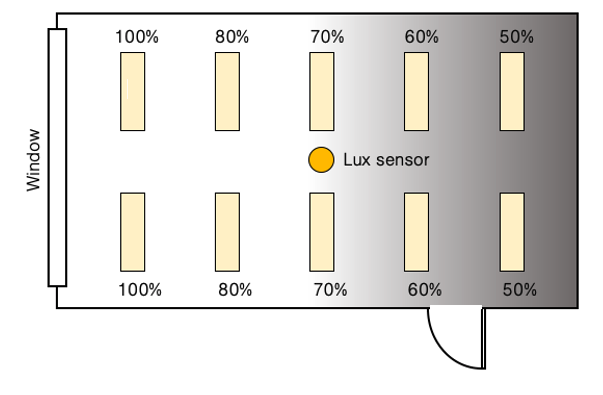
If you wish, you can define a separate daylight gain for each luminaire in a Casambi network. By default, the daylight gain for luminaires is set to 100%.
To set the daylight gain for a luminaire, navigate to the Luminaires tab, push Edit and then select the luminaire you wish to set the daylight gain for. Scroll to the Daylight gain slider and adjust this to reflect the approximate amount of natural light that you consider is present in the same areas that the luminaire illuminates. Tap on Back when finished and on Done to return to the Luminaires tab view.
Note: Daylight gain will only work for Open loop Daylight scenes.
Dedicated daylight sensor
If a luminaire has a built-in daylight sensor, you may wish that luminaire to only respond to values from that sensor. Alternatively, you may have a situation where you are using multiple daylight sensors, but you only wish to have one specific sensor affecting a particular luminaire. In such cases you can configure individual luminaires to react only to a specific sensor.
From the Luminaires tab select Edit and then select the luminaire you wish to configure. Scroll to Dedicated daylight sensor, tap and choose the correct controlling sensor from the displayed list. Tap on Done, then on Back, then on Done, again to return to the Luminaires tab view.
When configuring the Daylight control, Mode of operation as part of a scene, you will see an option to Use dedicated sensors. If this is enabled, a luminaire that has had a dedicated sensor assigned to it will only respond to values from that sensor. Luminaires that have not had any dedicated sensor assigned will be controlled by multiple sensors, if used. For example, if you have multiple lux sensors controlling the lighting in a room, luminaires without dedicated sensors assigned will respond to the average lux value from all sensors. Luminaires that have a dedicated sensor assigned will only respond to the lux value from the specific dedicated sensor.
Sensor placement considerations
To achieve the best performance from a daylight harvesting installation, it is important to carefully consider the locations of the lux sensors. The performance of the lighting control will depend totally on what the sensors "see". This is particularly important if you have lighting applications relying on side-lighting, reflected light, diffused daylight or where direct sunlight can influence the sensor performance. It is possible that a minor change in the sensor position or orientation can affect the overall system performance.
Ideally sensors should be positioned and orientated in a way that they are shielded from any direct glare. Indoor sensors should not normally be placed next to a window. It is best to position sensors in a way that they are only indirectly illuminated by daylight. Exterior sensors should be shielded from direct sunlight.
The lux sensor should be placed in a way that it receives a representative sample of the available daylight in the respective area. Having a too wide a field of view may result in detecting direct sunlight or illumination from light sources outside of the controlled zone. A too narrow field of view can make the sensor too sensitive to local changes in brightness.
Before placing the sensor, it is a good idea to use a separate lux meter to measure light levels in potential locations before choosing the final position for the daylight sensor.
A sensor that is used in Closed loop mode (i.e., intended for maintaining a constant illumination level in an area or on a surface) is usually mounted on the ceiling to enable it to view a representative area that includes the illuminated area it is controlling. It should not be placed in direct view of a window or, for example, a pendant luminaire.
In an ideal situation, closed loop systems should be configured when there is an absence of all light that is not being controlled by the sensor (i.e., at night without any daylight, and without any other lighting being active that is not being controlled by the sensor). In addition, it would be best to try to finish the installation as much as possible before measuring, so that all carpets, desks and other items are in their final place. This is because every object that is later brought into the measuring range of the sensor changes the amount of reflected light received by the sensor and thus also influences the constant light performance.
Open loop sensors are typically ceiling mounted and orientated towards a window or skylight to view incoming daylight but not any of the illuminated area that they are supposed to control. Alternatively, open loop sensors can be mounted far away from the area to be illuminated, for example outdoors. Open loop systems are easier to configure, since they only require a dimming response graph to be defined that tells the Casambi system what dim level to target for a measured lux value. This means that the configuration can be done at any time of day.
Regardless of the sensor chosen or intended mode of operation, the sensor manufacturer's specifications and installation and placement instructions should be followed.